A complete guide to building a Docker Image serving a Machine learning system in Production
A complete step-by-step guide for building a Docker image (GPU or CPU) along with explaining all best practices that should be followed which will be

Building a Docker image is generally considered trivial compared to developing other components of a ML system like data pipeline, model training, serving infra, etc. But an inefficient, bulky docker image can greatly reduce performance and can even bring down the serving infra.
0. Disclaimer
This blog aims to focus on building an ideal Docker image and not on its concept or benefits. I am assuming you have basic knowledge of a few topics wrt to Docker:
- General working of Docker
- Basics of Docker build, run
- Writing and syntax of a Dockerfile
1. General Docker build best practice
There quite a few very good source for general best-practice like the official docker guide, but I would like to keep this short and relevant to the ML system based project
- Requirements.txt must always have a python package version. Never ever just write package name, as it will then always install the latest package and in the process completely defeats the purpose of using docker.
- Always group similar RUN command which will result in a single Docker layer. (I will avoid the temptation to explain this as it is a little out of scope)
eg:
RUN apt update && \
apt install --no-install-recommends -y build-essential gcc curl ca-certificates python3 && \
apt clean && rm -rf /var/lib/apt/lists/*
- Use ‘- -no-cache-dir’ flag of pip as the targeted environment is the production as
RUN pip install --no-cache-dir --user -r /req.txt - Use .dockerignore to avoid unnecessary build context. This works exactly like .gitignore
- Whenever possible use the slim version of the base image like python:buster-slim, debian:buster-slim, etc.
- Avoid the use of Alpine based base Docker image. This might be a little controversial but trust me they don't work well with Python. Refer to this excellent blog by Itamar Turner-Trauring.
2. Building a Docker image for any Python Project (CPU):
Most of the time a ML system will be based on Python, so it critical to build any Python-based Docker image efficiently. Let us go through it.
2.1 Single Stage
- The single-stage will perform all the task in the same/single docker build-time.
- The flow is, select a base image, install OS packages, copy source, install packages, set entry point (if required) or other commands.
FROM python:3.8-slim

RUN apt update && \
    apt install --no-install-recommends -y build-essential gcc && \
    apt clean && rm -rf /var/lib/apt/lists/*
COPY ./req.txt /req.txt
COPY ./src /src

RUN pip3 install --no-cache-dir -r /req.txt
CMD ['python3', '/src/app.py']
EXPOSE 8080
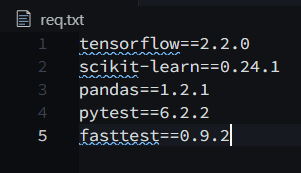
For demo purpose, I am using the following packages:
After running the docker build command the size of the docker image was 1.64 gb.

- Single-stage is very simple can work in many use case. It is not a bad practice but does have some fundamental cons, especially for a python based project.
- Here the use of ‘- -no-install-recommends’ in apt and ‘- -no-cache-dir’ in pip is key as I told earlier too we don’t want to store cache as it is not intended for a development environment but not for production. In fact, if you are using any CI/CD platform (like Github action) with limited storage space, it will only work using this method.
- Python library does not work out of the box, it must be first compiled in C. We just need the compiled part of any library, not all other leftovers. As you can see in the single-stage eg above; while performing ‘pip install’ all the libraries are first downloaded and then compiled.
- We should remove (& we can using bash commands) all the intermediate and leftover components created while installing libraries. This will full of hassles and can even break a library if done incorrectly. This is a real deal-breaker and so many of us will just avoid it & carry the bulkier image into production. But Docker Multi-stage comes to our rescue.
2.2 Multi-Stage
- Multi-stage Docker build is by far one of the most effective optimization technique while keeping them easy to read and maintain. To write a really efficient Dockerfile, you have traditionally needed to employ shell tricks and other logic to keep the layers as small as possible and to ensure that each layer has the artifacts it needs from the previous layer and nothing else.
- With multi-stage builds, you use multiple FROM statements in your Dockerfile. Each FROM instruction can use a different base, and each of them begins a new stage of the build. You can selectively copy artifacts from one stage to another, leaving behind everything you don’t want in the final image. To show how this works see the example.
# Stage 1: Builder/Compiler
FROM python:3.7-slim as builder
RUN apt update && \
    apt install --no-install-recommends -y build-essential gcc
COPY req.txt /req.txt

RUN pip install --no-cache-dir --user -r /req.txt

# Stage 2: Runtime
FROM debian:buster-slim
RUN apt update && \
    apt install --no-install-recommends -y build-essential python3 && \
    apt clean && rm -rf /var/lib/apt/lists/*
COPY --from=builder /root/.local/lib/python3.7/site-packages /usr/local/lib/python3.7/dist-packages
COPY ./src /src
CMD ['python3', '/src/app.py']
EXPOSE 8080

Comparing them, the multi-stage docker image size is 1.61 gb and the single-stage is 1.64 gb. It's an improvement (even it seems small though), a lot of things are going here, lets us try to understand in a nutshell.
- Line 1–5 is 1st stage or a compiler stage, where we are installing python libraries (which is first downloaded and & then complied in C, that's why we have even installed gcc). Then we are just copying the compiled libraries from stage 1 to stage 2 or the runtime stage using the syntax
COPY --from=<stage 1> stage1/src stage2/destination But as we can see from the screenshot, we are not seeing much significant improvement. We will certainly see a huge improvement in other languages, but python has some tricks in its sleeves,
- Many libraries now come as pre-compiled .whl are wheel format from PyPi, which does not need any kind of compilation.
- So does it mean, there is no scope of Multi-stage build for Python project? Absolutely yes!!! Not every package from PyPi are pre-compiled .whl format, many are all legacy tar.gz (tarballs compressed), which needs to be first compiled & here the Multi-stage build will work its charm.
- Also, Multi-stage is applicable is you are building a python package from source or using local package using setup.py, as again, they need to be compiled first.
I would highly insist you to read this article from Real Python explaining what are wheels in python.

From the req.txt that I am using for the demo, only the above packages are not wheel format & also they are already very small in size. But if some packages are not pre-compiled wheel and large in size will end up wasting a lot of disk size
3. Building a Docker image for any Python Project (GPU):
Building a CPU based Docker image is not complex, but not the same case with building a GPU based docker. If not build appropriately, it can end up in humongous size. I will focus on the practical and implementation part and not cover its theory part (as I think it is out of scope for this article).
3.1 Understanding Pre-requisite
- Both Tensorflow and Pytorch uses Nvidia CUDA gpu drivers. So latest Nvidia drivers, CUDA drivers and its respective cuDNN must be first installed on the host machine (I can’t include its process here as it is beyond the scope, perhaps for some other blog).
- After getting the host device ready, nvidia-docker2 must be installed, which enables the Docker engine to access underlying Nvidia gpu drivers.
The most critical part is to select the correct version/tag of CUDA, cuDNN for nvidia docker image and tensorflow/pytorch wrt to it. So that the ML system can utilize underlying gpu hardware. Trust me this can be really frustrating task, so I have some rule of thumb:
- Always use the same CUDA and cuDNN version in Docker image as present in the underlying host machine.
- Don’t blindly install the latest tensorflow/pytorch library from PyPi. It is absolutely incorrect that any version of both packages will work with any version of CUDA, cuDNN. In fact, the combination of the latest version of both, tensorflow/pytorch with CUDA/cuDNN may not be compatible. Always test the combination in a development environment first.
- Docker hub of Nvidia has a lot of images, so understanding their tags and selecting the correct image is the most important building block. The description from the official Nvidia docker hub is,
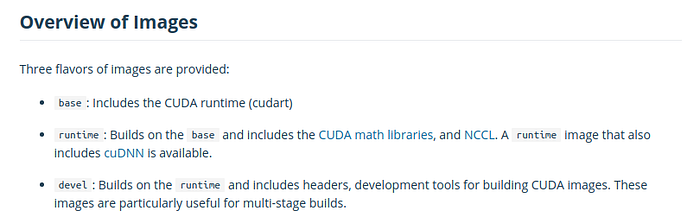
We are only interested in base, runtime and not in devel (as we are targeting prod environment). How to select an exact specific tag? I’ll answer it in the following sub-part.
3.2 Sinle Stage
Selecting tag: The rule of thumb which I follow is:
- Step 1: Check Version of CUDA and cuDNN of the underlying host machine
- Step 2: Select the Docker image based on step 1. So in my case, I have selected, ‘nvidia/cuda:10.1-cudnn7-runtime’. Why runtime? Because this is the one that includes both CUDA and cuDNN.
- Step 3: Select the correct version of tensorflow/pytorch which is compatible with this version of CUDA and cuDNN. In my case, it was tensorflow=2.20.
- Cautionary step: The docker image from Nvidia might be older Ubuntu (18.04 or even 16.04) which will install python 3.6. So attention must be given here to check the compatibility of your project as well as external packages with the python version. Anyways specific version can be installed from the source.
FROM nvidia/cuda:10.1-cudnn7-runtime

RUN apt update && \
    apt install --no-install-recommends -y build-essential software-properties-common && \
    add-apt-repository -y ppa:deadsnakes/ppa && \
    apt install --no-install-recommends -y python3.8 python3-pip python3-setuptools python3-distutils && \
    apt clean && rm -rf /var/lib/apt/lists/*

COPY req.txt /req.txt
COPY ./src /src
RUN python3.8 -m pip install --upgrade pip && \
    python3.8 -m pip install --no-cache-dir -r /req.txt
CMD ['python3', '/src/app.py']
EXPOSE 8080
Note: As you can the Docker image from nvidia is based on ubuntu 18.04, I have to make a little additional adjustment to install tensorflow=2.2.0.

3.3 Multi Stage
- We can use the same mechanism which I showed in 2.2.
- The first stage will be used to download and compile python packages and then they will be copied to the second stage or runtime stage
- All thumb rules from 3.2 must be also used here
# Stage 1: Builder/Compiler
FROM python:3.8-slim as builder
RUN apt update && \
    apt install --no-install-recommends -y build-essential gcc
COPY req.txt /req.txt

RUN pip install --no-cache-dir --user -r /req.txt

# Stage 2: Runtime
FROM nvidia/cuda:10.1-cudnn7-runtime

RUN apt update && \
    apt install --no-install-recommends -y build-essential software-properties-common && \
    add-apt-repository -y ppa:deadsnakes/ppa && \
    apt install --no-install-recommends -y python3.8 python3-distutils && \
    update-alternatives --install /usr/bin/python3 python3 /usr/bin/python3.6 1 && \
    update-alternatives --install /usr/bin/python3 python3 /usr/bin/python3.8 2 && \
    apt clean && rm -rf /var/lib/apt/lists/*
COPY --from=builder /root/.local/lib/python3.8/site-packages /usr/local/lib/python3.8/dist-packages
COPY ./src /src
CMD ['python3', '/src/app.py']
EXPOSE 8080
Note: To make python 3.8 as default I have added some additional code, if this is not the case for you then you can avoid this hassle.

- Again not a significant improvement but even here the logic/explanation is applicable as was in case 2.2
- I highly recommend always use a Multi-stage build in any use case as it also improves readability.
4. Inspecting Docker Image using Dive
- Even after building a docker image by following all possible best practice, we should still investigate for any improvement.
- Dive is an excellent command-line tool designed for exploring a docker image, layer contents, and discovering ways to shrink the size of your Docker/OCI image. It has 24k+ GitHub stars. Also, it is very easy to use and navigate.
- It has two very useful matrics:
- Potential wasted space
- Image efficiency score
- But its best feature is its integration with any CI tool. We can set a condition on either of the two or both metrics and if the condition fails, the CI job will also fail. This way we can always establish confidence in the Docker image created from every CI job.
5. Conclusion
The primary goal always must be minimal docker image size, since any docker image build for ML system will be always heavy. We should always follow all best practice especially Multi-stage build and versioning of packages. Last but also most important for gpu based images is to test the configuration on the dev environment.
Note: I had originally published this blog at towardsdatascience.com found here